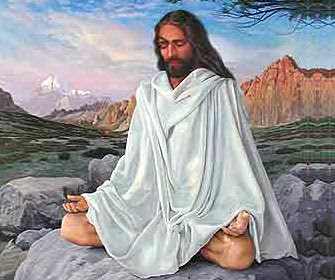
Source for adaptation and translation http://theravadin.
…
Source for adaptation and translation http://theravadin.
Published with Blogger-droid v1.6.5
Posted by Dhammarakkhittas at 15:31
Labels: ashtanga yoga , Brahmanism , Buddha , B
|
Reactions: |
0 comments:
Post a comment
http://yoga.org.nz/postures.
Main Page
Welcome to our yoga postures section. Here you will find
yoga moves that are broken down to the bare basics with colour photos
to match. We also have state of the art flash yoga animation technology that you can use to view these moves in full screen size, full colour and with full instruction.
Yogic exercises cater to the needs of each individual
according to his or her specific needs and physical condition. They
involve vertical, horizontal, and cyclical movements, which provide
energy to the system by directing the blood supply to the areas of the
body which need it most.
In yoga, each cell is observed, attended to, and
provided with a fresh supply of blood, allowing it to function smoothly.
The mind is naturally active and dynamic, while the innerself is
luminous. In this section we will give you plenty of yoga images and
instruction.
|
Breathing Pose
|
Arm Stretch
|
Kneeing Twist
|
||

Breathing Pose |
||||
|
The simple act of learning to control the breath |
|
|
|
|
|
|
|
|
|
Control of the breath is an essential element in |
|
|
|
|
|
|
|
|
|

|
|||
|

|
|
|
|
|
|
|
|
|
||||
|

Yoga breathing is also call Pranayama . Many say that Pranayama (Rhythmic control of breath) is one of the bests medicines in the world . Right click the link and save as to download a beginners breathing routine . Then watch in windows media player. Click the BIG play button in the middle below. To watch a Pranayama Breathing overview . Please visit: http://www.youtube.com/watch?
|

The Virasana Arm/Shoulder Stretch
Hero Pose
The purpose of this pose is to help give the entire
body a very complete stretch from the heels to the head. It improves
strength and endurance and helps to control your breathing in
conjunction with the movements of the body.
It eases and stimulates the joints especially the
knees, ankles and shoulders. It reduces and alleviates backache and
improves the circulation of the entire body.
 |
|
Instruction Table
|
|
|
1
|
|
| Come in to a position on your hands and your |
| knees with your knees together and your feet slightly wider than hip width apart. Your big |
| toes & little toes pressing firmly into the floor | |
|
2
|
|
| Push back with your hands & sit between your |
| buttocks on the floor, make sure you roll your calf muscles out wards so |
| your not sitting on them. | |
|
3
|
|
 |
Make sure the inner calves are touching the outer thighs and your ankles are outside your buttocks, arms resting at the sides. |
|
4
|
|
 |
Inhale as you slowly raise your arms to shoulder height, shoulders down. |
|
5
|
|
 |
Exhale lengthen out through the fingertips & turn your palms to the roof. Inhale stretch your arms overhead. |
|
6
|
|
 |
Interlock the fingers. Slowly exhaling turn the palms |
| towards the ceiling, and with a powerful push lift up from the belly |
| into your chest and shoulders. | |
|
7
|
|
 |
Exhale bring your hands down in a smooth continuance motion…. |
|
8
|
|
 |
Now bringing your arms interlocking behind your back |
| with straight arms, being careful not to roll the shoulders forward, |
| squeezing the shoulder blades together and opening the chest on the |
| front of the body. | |
|
9
|
|
 |
Inhale hands back to the side |
| Repeat 2-3 more times |
Please Visit:
http://www.youtube.com/watch?

Kneeing Twist Pose
Regular practice of the kneeling twist pose
will aid in your ability to rotate the spine and upper torso more
effectively, while increasing the flexibility and strength in your back
and abdominal muscles. It also massages, stimulates and rejuvenates the
internal abdominal organs.
This pose is a good beginners pose and will get you ready for more advanced twists.
|
To view in flash - click the image below
|
|
|
|
Instruction Table
|
|
|
1
|
|
 |
Sit on your heals with your knees together, the tops of the feet |
|
pressing firmly into the ground. Your head, shoulders, and hips should |
|
be in one straight line. Arms relaxed by the side keep your base firm by contracting your buttocks. |
|
|
2
|
|
 |
Inhale, extending the spine upwards, exhale twist around to the |
|
right, placing your left hand on the outside of your right thigh, |
|
turning the head in the direction of the twist, but keeping the head and |
|
shoulders relaxed. Take a few breaths here, keeping the stomach soft and the eyes soft. Repeat on the other side |
Please Visit:
http://www.youtube.com/watch?

The Triangle Pose
Triangle pose tones the leg muscles, spinal nerves and abdominal organs; it contributes towards a strong healthy lower back.
The triangle gives an excellent and complete stretch
throughout the entire body.
|
To view in flash - click the image below
|
 |
|
Instruction Table
|
|
|
1
|
|
 |
Align yourself in mountain pose. |
| Continuing with your smooth |
| flowing breath | |
|
2
|
|
 |
Inhale deeply and jump your feet out landing approx |
| 1.2-1.5m apart. your feet need to be in line and pointing forward at |
| right angles. Next raise your arms to shoulder level, be sure that they |
| are in line with each other. Stretch your arms out from the middle of |
| your back. Lift your chest and look straight ahead. | |
|
3
|
|
 |
Now turn your right foot out while keeping your hips to |
| the front, and turn your left foot in from 90 to 70 degrees, by pivoting |
| on your heel. Insure your right heel is in line with the instep of the |
| left foot. |
| This is important as it sets the base for this pose. | |
|
4
|
|
 |
The kneecaps and thighs are pulling up, |
| simultaneously pushing downward through your feet into the floor. |
| Inhale, extend the spine, exhale as you bend to the right, pushing out |
| from the hips, through the right arm… | |
|
5
|
|
 |
Taking your right hand to a comfortable position on your |
| leg, your left arm coming up to straight, moving down as far as |
| possible without turning the hips or torso. Keep the thighs firm and |
| rolling around towards the buttocks, moving the left hip back and open |
| the chest. | |
|
6
|
|
 |
Inhale, extend the neck and spine, exhale, turn your head to look up at your left hand. |
| Keep |
| your head, your buttocks and your heels in one straight line,not |
| looking down with you body, keep opening your whole body up. |
| Breathe easy. |
Click here to view the Triangle pose
http://www.youtube.com/watch?

The Tree Pose
This pose harnesses the powers of mental concentration, while
allowing you to calm the mind. It develops balance and stability, and
strengthens the legs and feet, also increasing flexibility in the hips
and knees.
The tree pose is a balance pose incorporating three lines of
energy, emitting from the centre outwards. One line proceeds down the
straight leg, one line extends up the spine and out the fingertips, and
the third moves outward through the bent knee.
|
To view in flash - click the image below
|
 |
|
Instruction Table
|
|
|
1
|
|
|
|
Align yourself in mountain pose. |
| Continuing with your smooth |
| flowing breath | |
|
2
|
|
 |
On your next inhale; shift the bulk of your weight onto |
| your left foot. Exhale bend the right knee, and assisting with your |
| hand, place the sole of your right foot as high as possible into the |
| left inner thigh, with toes pointing down, steady yourself, and |
| breathe easy. | |
|
3
|
|
 |
Next raise your arms to shoulder level, be sure that |
| they are in line with each other. Stretch your arms out from the middle |
| of your back. Lift your chest and look straight ahead. Keep completely |
| focused on the pose. | |
|
4
|
|
 |
Now bring your palms together in prayer |
| position. Keeping your eyes focused on a point in front of you, will |
| assist your balance. | |
|
5
|
|
 |
Inhale as you raise your arms overhead keeping your palms together and stretching upwards through the fingertips. |
| Keep working your right knee back and contracting your buttocks muscles in and down. |
| Feel your abdomen plane and hips facing straight ahead, while lifting out of the waist. |
http://www.youtube.com/watch?

The Warrior Pose
Virabhadra
The Warrior pose is
named after the mythic warrior-sage, Virabhadra. This challenging pose
strengthens the entire body while improving mental capacity and self
control.
It builds, shapes and tones the entire lower body. It tones the
abdominal section and helps to prevent, reduce and eliminate back pain.
The entire upper body -front and back- is worked and doing this pose
increases the capacity of the respiratory system.
|
To view in flash - click the image below
|
 |
|
Instruction Table
|
|
|
1
|
|
 |
Stand in mountain pose continuing with your smooth flowing breath. |
|
2
|
|
 |
Jump your feet sides ways and sweep your arms out to the side so your |
|
ankles are below your wrists. Establish your foundation, by pulling |
|
your knees and thighs up, tucking your tailbone under, pushing your feet |
|
firmly into the floor. |
|
Visualise |
|
an imaginary line running vertically down the centre of your body, |
|
dropping your shoulders. Squeeze your arms and legs away from the |
|
centreline. |
|
|
3
|
|
 |
Keep an awareness of this line as you turn your right |
| foot out to 90 degrees and turn your left foot in to 70 degrees. Ensure |
| the heel of your front foot aligns with arch of your back foot, hips |
| facing forward. |
| If your body wants to turn off centre, counter-act it by pushing simultaneously in opposite directions from the centre line. | |
|
4
|
|
 |
Inhale, an as you exhale bend your right |
| leg, pulling up with the outside and inside of the thigh to form a right |
| angle at the knee. Only go as low as you can with out turning your hips |
| off centre. |
| Ideally |
| you want your knee directly above your ankle with you leg coming |
| vertically out of the floor like pillar. Keep the power flowing through |
| the back leg into the floor. | |
|
5
|
|
 |
Inhale lift the spine; exhale turn your head to look over your right arm. Take a few deep breaths through the nose. Hold the pose and breathe smooth. Reverse the procedure back to mountain pose and repeat back to the other side. |
Please Visit:
http://www.youtube.com/watch?

Mountain Yoga Pose
The Mountain Pose is one of the most important poses in yoga. It is the start and finish point of all standing poses.
When standing in mountain pose, the mind is quiet,
and the body strong and still, like a mountain. This is a pose you can
practise in your daily life, practising to stand correctly will have a
profound influence on your physical and mental well being.
|
To view in flash - click the image below
|
|
|
|
Instruction Table
|
|
|
1
|
|
|
|
Stand with your feet hip width apart, so the outsides of the feet are almost parallel edged. Press and spread the toes into the floor. Feel the weight of your |
|
body distributed evenly through your feet, from the toes to the heels, |
|
keep pressing firmly into the floor. |
|
|
2
|
|
|
|
Lift the kneecaps up by contracting the front thigh |
| muscles, but not locking the backs of the knees. Pull up with the back |
| of the thighs, and activate the hip and buttocks to level the pelvis. |
|
3
|
|
|
|
Your hips should be directly over your knees, and your |
| knees over your ankles. This gives you a stable foundation and by |
| positioning the pelvis properly, keeps the spine healthy. | |
|
4
|
|
|
|
Now extend the spine, by slowly inhaling, lifting up |
|
through the legs as you lift the ribcage, opening the chest and dropping |
|
the shoulders down, extending the neck, keeping the jaw and eyes soft. |
|||
|
|||
|
|||

The Prayer Pose
This pose is simple, but very effective, and is a
key movement to more advanced poses. This pose will teach you how to
push from under the shoulders and out of the lats, the major muscle
group of the back. A key movement in a lot of yoga poses.
It strengthens and aligns the upper body while
releasing tension and increasing the circulation to the shoulder joint,
which is a ball and socket joint. It also aids in strengthening the
abdominal and lumber region as you look to form a solid base.
|
To view in flash - click the image below
|
 |
|
Instruction Table
|
|
|
1
|
|
 |
Centre yourself in mountain pose and take a |
| few deep breaths here, breathing down into the abdomen, continuing the |
| breathing that you are now familiar with. | |
|
2
|
|
 |
Inhale, raise your arms to shoulder height and stretch them out in the opposite direction to each other |
|
3
|
|
 |
Now twist your arms from the shoulder and turning your palms upwards. Keep the body in a nice strong upright position |
|
4
|
|
 |
Bring your arms out in front of you, pushing |
| your elbows firmly together and your fingers extending away from you, |
| while focusing on pulling your shoulder blades together.. | |
|
5
|
|
 |
Continue squeezing the elbows together as you bring your palms together |
|
6
|
|
 |
Now bend at the elbow and take the forearms to vertical. |
| Keep pressing firmly with the palms and the elbows as you breathe the |
| arms upwards. With each exhale moving slightly higher. |

The Shoulder Shrug
The shoulder rotation is another pose which can be practiced anywhere and at any time.
It strengthens and aligns the shoulder region while
releasing tension and increasing the circulation to the shoulder joint,
which is a ball and socket joint. It also aids in strengthening the
abdominal and lumber region as you look to form a solid base.
|
To view in flash - click the image below
|
|
|
|
Instruction Table
|
|
|
1
|
|
 |
Align yourself in mountain pose. |
| Continuing with your smooth |
| flowing breath | |
|
2
|
|
 |
As you inhale, lift your shoulders to your ear lobes, keeping the head erect and soft. |
|
3
|
|
 |
As you exhale, rotate the shoulders around |
| by pushing up out of the chest and squeezing the shoulder blades together, rotating them |
| in a full circle. | |
|
4
|
|
|
|
Back down into mountain pose |
| Repeat 3 more times |
Please Visit:
http://www.youtube.com/watch?

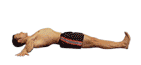
The Lying Basic Twist
Doing this pose will rapidly increase strength and muscle tone in your midsection.
The lying twist is another pose which is very
simple yet extremely effective. This pose is soothing to the spine and
neck, and warms and frees the lower back and hips and it also improves
digestion and assists in toxin elimination.
|
To view in flash - click the image below
|
 |
|
Instruction Table
|
|
|
1
|
|
 |
Come to a position lying on your back and stretch your arms out to |
|
the side and place your palms and shoulders firmly on the floor. Move your shoulder blades under. Spread your toes apart. Feel the |
|
back and shoulders moulding to the straight lines of the floor. |
|
|
2
|
|
 |
Bend your knees as far as they come towards the chest.
|
|
3
|
|
 |
Inhale, keeping your knees and ankles together,
|
|
Exhale, rolling your knees to the right. Focus on keeping your arms
|
|
pressing out wards and your shoulders pushing firmly into the ground.
|
|
You may feel or hear your spine lengthening as it extends into the
|
|
correct alignment.
|
|
Knees & ankles together breathe, focus on creating length between the left lower rib and the hip,
|
|
|
4
|
|
 |
Now turn your head to look over your left hand. Relax in to this pose, stomach soft, breathing soft and relaxed. Reverse the pose back up and repeat to the other side |

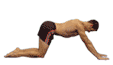
The Downward Facing Dog
Adhomukha Svanasana
The downward yoga pose is
named as such as it resembles the shape of a Dog stretching itself out.
This pose helps to strengthen, stretch and reduce stiffness in the legs
while strengthening and shaping the upper body. Dog pose Yoga Posture .
One of the main yoga asanas. If you have time for only one posture try
this one.
Holding this pose for a minute or longer will
stimulate and restore energy levels if you are tired. Regular practice
of this pose rejuvenates the entire body and gently stimulates your
nervous system.
|
To view in flash - click the image below
|
 |
|
Instruction Table
|
|
| 1 | |
 |
Come up onto your hands and knees with your knees hip |
| width apart and the hands shoulder width apart, your fingers wide |
| pressing firmly into the floor. | |
| 2 | |
 |
Inhale, arch your spine and look up as you turn your toes under. |
| 3 | |
 |
As you exhale straighten your legs and pause here for a moment. |
| 4 | |
 |
Now push the floor away from you hands, positioning your |
| body like an inverted V, achieving a straight line from your hands to |
| your shoulders to the hips. Straight arms and straight legs. |
| As you inhale press downward into your hands and lift outward out of the shoulders. |
| Lift your head and torso back through the line of your body. |
Please Visit:
http://www.youtube.com/watch?

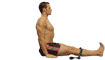
The Seated Forward Bend
Paschimottanasana
The purpose of this pose is to give the entire back
of your body a very complete stretch from the heels to the head. It is
excellent for posture improvement and stimulates the internal organs as
well.
It adds in improved mental concentration and
endurance and helps to control and calm the mind. It relieves
compression while increasing the elasticity of the spine, it also
strengthens and stretches the hamstrings.
|
To view in flash - click the image below
|
 |
|
Instruction Table
|
|
| 1 | |
 |
Come to a sitting position with your legs together in front of you. |
| Move |
| the fleshy part of your buttocks from underneath you, so you are on the |
| top of your sitting bones, which are located at the very top of your |
| legs. | |
| 2 | |
 |
Roll the thighs inwards so that the kneecaps are facing directly upwards. |
| Activate the legs by pressing down into the floor, and out through the heels. |
| Spread your toes wide and pull them towards you. |
| Lengthen your lower back muscles down as you extend your spine up and out of the pelvis. | |
| 3 | |
 |
Now take your strap around both feet. The |
| strap`s purpose is to keep the spine straight. This is very important. |
| Be aware the head is an extension of the spine, so keep it aligned |
| accordingly. |
| Use the breath to create the optimum degree of intensity in the stretch. | |
| 4 | |
 |
On your next exhale; come down the belt further while |
| maintaining the extension on the front and back of the torso. Some of |
| you will be able to grab the sides of your feet. Breathe softly and |
| continuously. Don’t pull yourself forward by the strength of your upper |
| body. |
| Keep bending at the hips, maintaining a relaxed head and neck. | |
| 5 | |
|
Go a little further, relax your abdomen, and inhale, as |
| you lengthen, exhale, and come further forward, increasing the space in |
| your vertebrae. |
Please Visit:
http://www.youtube.com/watch?

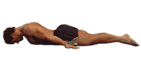
The Locust Pose
Salabhasana
The locus yoga posture is
named as such as it resembles the shape of the insect known as the
Locust. This pose helps to strengthen, stretch and reduce stiffness in
the lower back while bringing flexibility to the upper back region.
When you first begin to practice this pose, your
legs may not move very far off the floor. Please continue and stay
positive as you will find your range will continue to improve the more
you practice. Learning to master this pose will hold you in good stead
for more advanced back bends.
|
To view in flash - click the image below
|
 |
|
Instruction Table
|
|
| 1 | |
 |
Come to a position lying face down on the floor, with |
| your arms along side your body, palms and forehead down. Bring your |
| knees and ankles together. Squeeze the shoulder blades together and |
| down. Push your palms into the floor. Pull the abdominals inwards, |
| contract the buttocks, and press the hips and pubis firmly into the |
| floor. | |
| 2 | |
 |
On your next exhale; raise the legs to a height that is comfortable but challenging. Keep the buttocks activated, lock the knees, keep the ankles together. |
| 3 | |
 |
Extend the front of your body as you pull |
| the shoulder blades together, raising the head, the arms, and upper |
| torso away from the floor, looking straight ahead, opening the front of |
| the chest and pushing down the lines of the arms. |
| Keep the legs working strongly. |
Please Visit:
http://www.youtube.com/watch?

The Bridge Pose
The Bridge Pose is
a simple yet very effective pose to practice. It helps to promote a
healthy flexible spine while strengthening the legs and buttock muscles.
It also helps to stretch and stimulate the abdominal muscles and
organs.
It aids in easing and stimulating the mind and is a great way to reenergize if feeling tired.
|
To view in flash - click the image below
|
 |
|
Instruction Table
|
|
|
1
|
|
 |
Lie on your back with your legs bent, heels close to the buttocks, Feet pressing firmly into the floor, hip width and parallel. |
| Your arms should be slightly out from your sides, the palms of your hands pressing firmly into the floor. | |
|
2
|
|
 |
Inhale, and with the exhale raise the hips up by pushing strongly |
|
into the floor with your feet. Keep the buttocks firm, and press the |
|
shoulders and arms into the floor. Only go to the height that you are |
|
comfortable with. |
|
Take a few nourishing breaths in this position, as you keep opening the chest and lengthening the torso. |
|
|
3
|
|
 |
Now bring your arms over your head to the floor behind
|
|
you. Keep lifting your buttocks away from the floor, keeping them
|
|
contracted, which will protect the lower spine, and work softly with the
|
|
breath, keeping the head and neck relaxed.
|
|
This
|
|
pose stretches the whole front of the body, and brings mobility to the
|
|
spine. Breathing is improved from the opening of the ribcage and chest
|
|
area.
|

The Extended Child’s Pose / Garbhasana
The Childs Yoga pose when
practiced regularly is very beneficial to your entire mind and body. It
helps to release the pressure on the spine while providing an entire
stretch through the upper body to the fingertips. It also aids in
strengthening and stretching the insides of the legs while massaging the
internal organs.
Breathing will becomes more efficient and your mind
will become clear. It also aids in improved mental processes and helps
to rejuvenate and energize the entire being.
|
To view in flash - click the image below
|
 |
|
Instruction Table
|
|
|
1
|
|
 |
Bring your big toes together and your knees wide apart, inhale as you lift your spine and extend your stomach. |
|
2
|
|
 |
Exhale bend forward from the hips as you walk you hands |
| out as far in front of you as possible, extending from the hips to the |
| fingertips. | |
|
3
|
|
 |
Place your forehead on the ground & buttocks
|
|
back to the heels. Work your pubis to the floor and strech the inner
|
|
thigh muscles. Focus on the breath.
|
|
|
4
|
|
|
|
Breathing into the abdomen as you extend it |
| forward in to the breastbone, creating length through the upper body. |
| Exhale from deep in the abdomen relaxing in the spine and continue the |
| slow controlled breathing. |
Please Visit:
http://www.youtube.com/watch?

The Standing Forward Bend
This pose aids in digestion and is restorative. It
frees the rib cage allowing for improved breathing. It aids in mental
concentration and helps to revive mental and pysichal exhaustion. The
heartbeat is slowed and the lower back is strengthened and pressure is
removed from the lumbar region.
It increases flexibility while strengthening and
developing the hamstrings. It also helps to strengthen the feet and
ankles while realigning the entire body.
|
To view in flash - click the image below
|
 |
|
Instruction Table
|
|
|
1
|
|
 |
Stand in mountain pose, in the centre of your mat, with your hands in prayer position. Jump your feet wide apart. Keep the outside of your feet running parallel while lifting your |
|
arches, pulling up with the thighs and the tail bone tucked under. |
|
|
2
|
|
 |
Place your hands on your hips and feel the extension up out of the waist. |
|
3
|
|
 |
Inhale, As you exhale bend at the hips extend forward,
|
|
continue lifting out of the hips keeping your legs strong and your base
|
|
nice and firm, looking forward to begin with. Keep the extension on the
|
|
stomach, which will help keep your back flat protecting it.
|
|
Take a few breaths here.
|
|
|
4
|
|
 |
Now take your hands to the floor extending from the lower abdomen to |
|
the breastbone and through the spine. Some of you maybe on the finger |
|
tips. |
|
If |
|
you can’t keep your spine straight put your hands on your knees and |
|
keep slowly working down your legs, working with your body, not against |
|
it. Lift your sitting bones to the ceiling. |
|
|
5
|
|
 |
Draw your shoulders down your back so you can extend the neck with ease. |
| Remember to keep the arches high. |

The Boat Pose
Doing the boat pose will rapidly increase strength and muscle tone in your midsection.
Keep challenging yourself to stay in this pose
longer. If you find the stimulation of the midsection becoming intense,
just persist with it, knowing your mind has ultimate control over the
body.
|
To view in flash - click the image below
|
 |
|
Instruction Table
|
|
|
1
|
|
 |
Find yourself on your sitting bones, lifting out of the hips. |
| Extend your spine upwards, and press the soles of your feet into the floor, with the knees and ankles together. | |
|
2
|
|
 |
Using your fingertips on the floor for balance, extend your abdomen as you lean back slightly. |
|
3
|
|
 |
Bring your lower legs up, parallel to the floor.
|
|
Breathe softly, in and out through the nose, while opening the chest and
|
|
squeezing the shoulder blades together.
|
|
Focus on a point at eye level in front of you. You may find this pose challenging to begin with
|
|
|
4
|
|
 |
Now bring your arms up beside your knees, parallel to the floor, |
|
opening the chest. Keep your focus on that point in front of you. This |
|
will help your stability. Continue with the controlled breathing. Feel the stimulation of the entire abdominal region, as you hold this pose for a few more breaths. |
|
|
Advanced Variation of The Boat
|
|
 |
Now bring your legs up to straight. Continue to keep your focus on that point in front of you. Continue with the controlled breathing. |
Please Visit:
http://www.youtube.com/watch?